 Blackboard
Gradebook
Blackboard
GradebookCreating Grade
Columns | Entering Grades
Exporting the Gradebook | Importing the Gradebook
(Information not
covered in this tutorial, such as weight grades, can be found in the
Assessemnt manual for Blackboard. A link to this manual as a PDF file
can
be found under Teacher Resources on the CELT site.)
The gradebook can be used within Blackboard in two ways. First, if you create online quizzes for your students, the system will grade them automatically and record the results. You do have the ability, once a quiz is taken, to change the point total for the student if necessary.
The second is to create entries for assignments you wish to add to the gradebook, such as papers, reports, speeches, or paper and pencil tests. This page will work you through the process of doing this.
Creating Grade Columns

Go to the control panel and click on Gradebook.
![]()
You have a number of options available from this menu.
- Add Item will let you add a grade for something not done directly in Blackboard, such as a paper, a pop quiz, a presentation, etc.
- Manage Items will let you reorder the items in the gradebook.
- Gradebook Settings will allow further customization of the screen view.
- Weight Grades will allow you to do just what it says.
- Download Grades will let you to export the grades in a format readable by Excel to your computer.
- Upload Grades will let you import changes you made to the gradebook from the downloaded copy. These changes will then be seen by your student when grades are checked.
For now, click on Add Item to create a grade column.
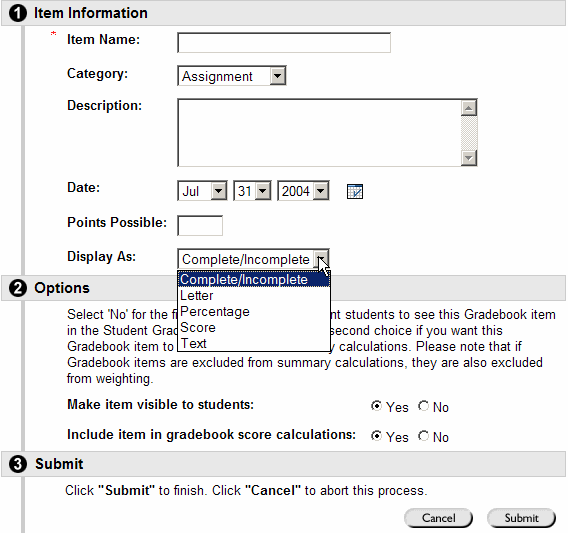
Fill in the Item Name: box. Keep it short, as the longer the name, the wider the column you will see on the screen. You can complete the other options, paying attention to the Display As: option. This is how the information will show in the gradebook. You also need to enter the number of points for the assignment. When ready, click Submit. The next screen will tell you it was received by the computer, so click OK on that screen.
The item you added will now be the last column on the screen before Total. In this case, it is Essay 1, worth 50 points.
Entering Grades
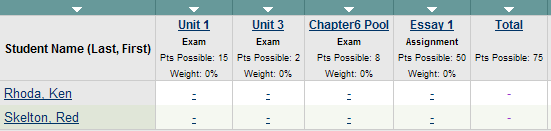
From the Control Panel, click on Gradebook. You will see a gradebook view similar to the one below.
Select the item you wish to grade by clicking on the name of the item. For this example, we will be entering the grades for Essay 1, so you would click on Essay 1.

Click on Item Grade List.
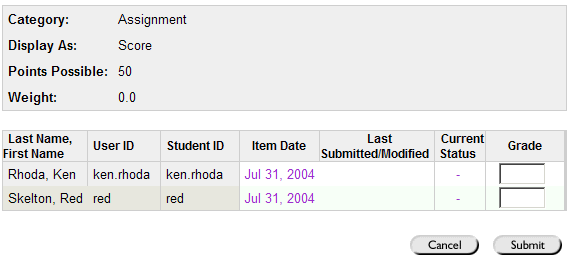
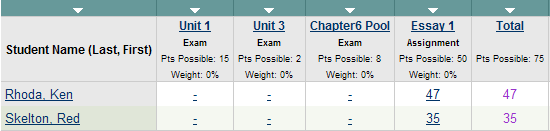
Enter the score for each student and then click Submit. On the confirmation screen, click OK. You will now see the gradebook with the scores entered.
You have the option to go into the item again and add information for individual students at a later date, change scores, etc.
Exporting the Gradebook
From the Control Panel, click on Gradebook. You will see a menu bar similar to the one below.
![]()
Click on Download Grades.
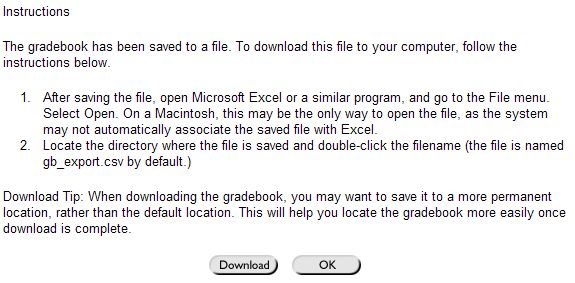
The export will be in the form of a .csv document. Excel can read this document. Click Download.
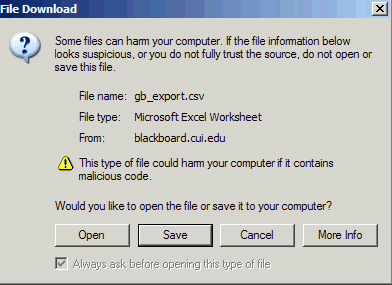
Click Save since you want to keep the document on your hard drive.
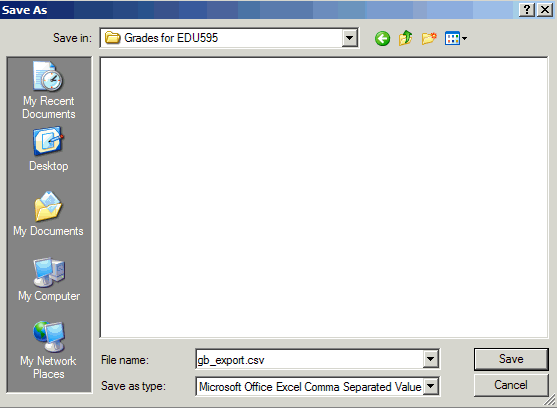
Navigate to where you want to save the grades. To find them easily, you may wish to create a folder for the course in the My Documents folder on your hard drive.
NOTE: The default name of the document - gb_export.csv. It isn't very descriptive, and every time you export, it will give you the same name. CHANGE THE NAME to reflect the course and the date. For this example, since it is for EDU595, the name would change to EDU595_090504.csv to reflect the course and the date it was saved. You must retain the .csv as the type of document.
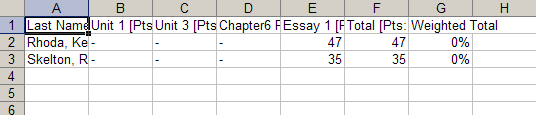
From your hard drive, click on the document to open it. It will open in Excel and look similar to the one above. From there you can modify the information. Note which columns you change as this will be important in the importing process back to Blackboard.
When you go to File/Save the gradebook spreadsheet after making changes, you will get this window in Excel:

If you plan to import the updated information back into Blackboard, you must click YES. This will save the document in .csv format. When you click the X in the upper right area to exit the program, you will get another message about saving the document. This time click NO and you will exit the program.
Importing the Gradebook
From the Control Panel, click on Gradebook. You will see a menu bar similar to the one below.
![]()
Click on Upload Grades.
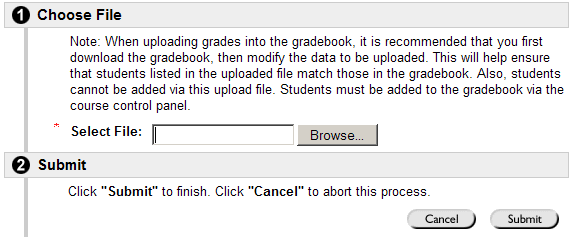
Browse to where the updated file is located on your hard drive. Then click Submit.
You will see a screen similar to the one below. It will be different since the names of your assignments and tests will be in the list, not the ones from this example.
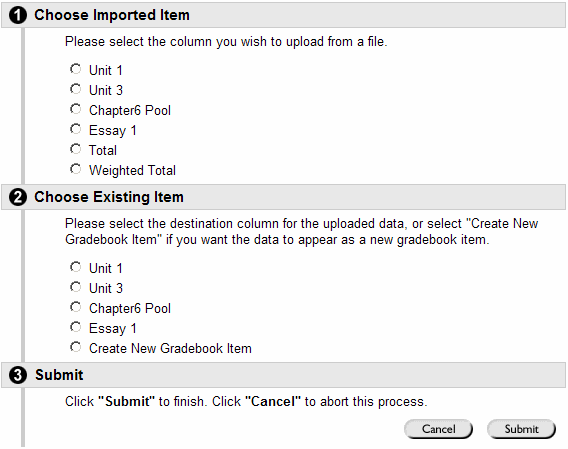
You will NOT be uploading the entire spreadsheet with one action. You will be uploading the spreadsheet column by column. Under 1 click the column you wish to import. Under 2 click destination column in Blackboard. Then click Submit.
Note you can not import the Total or Weighted Total columns. Blackboard will update them automatically with the new item grade information.
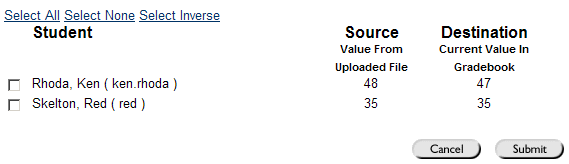
You can import for the entire class or individuals. Place a check mark in front of each name you wish to update. If it is everyone, click the Select All link to automatically place checkmarks in front of every name. Click Submit. On the confirmation screen, click OK.
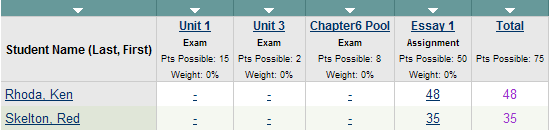
You will see your updated information on the screen.