Tables allow you to create a row and column format to present text and number data. If you are doing number calculations, use Excel rather than Word. The calculating capability is much greater in Excel.
Creating a Table | Formatting a Table
| Remember, most times you make a change you do not like, you can undo that change by pressing Cntr-Z. |
Go to Table/Insert/Table...
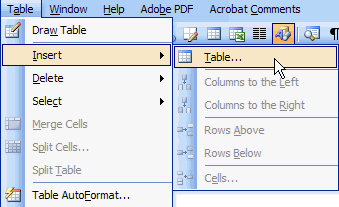
The following menu will appear:
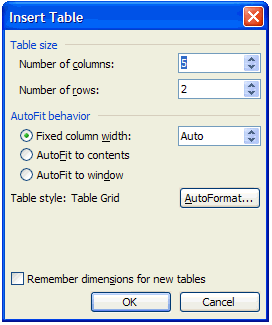
You can select the number of columns and rows from the Table size menu. The number of rows isn't as important as the number of columns. You can easily add more rows, but adding columns is harder. Think through your table carefully before you select the number of columns. After setting the numbers, click OK to create the table.
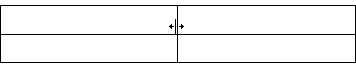
This is a 5 column, 2 row table:
![]()
The cursor will be in the upper left cell of the table. Type in the information for this cell, and then press TAB on the keyboard to go to the second cell in the first line. Each time you press TAB you move to the next cell. When you are in the lower right hand cell and press TAB, a new row will be created.
You will notice that when you slide the cursor over the table, a symbol appears above and to the left of the first cell.

Clicking on the + symbol will select the entire table. This is helpful in formatting the table or deleting it entirely.
Column Width:
You can change the width of any of the columns by sliding the cursor over the vertical line separating the two columns. The cursor will take on a new shape, similar to parallel lines with an arrow on each side. When it is in this configuration, click and hold the mouse button, sliding the vertical line right or left as needed. The type in the cells will adjust automatically.
Text Format:
Highlight the text you want to format. Using the traditional Word tools, you can create Bold, Italic, centering, etc. (See Word Resources - Text for further help.)
Delete a Row or Column:
Place the cursor in one of the cells in the row you wish to delete. Right click on the mouse to bring up this menu:

Go to Delete Cells and another menu will appear:
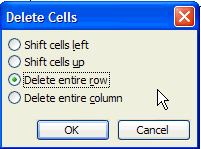
Click the button to Delete entire row and then click OK. If you were deleting a column, you would select the last option, Delete entire column.
Merging Cells:
You may want to insert a title for the table that would cover more than one column. You can do this by placing the cursor in the first cell of the group you want to merge, click and hold the mouse, dragging over all the cells to be merged. Release the mouse button. With the curser over the highlighted area, right click on that area.
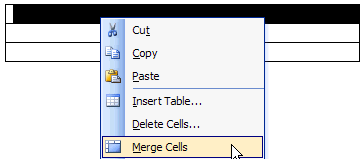
From the options, select Merge Cells. Now the cells will appear as in the example below:

Splitting Cells:
You can divide a cell into more columns or rows. Place the cursor into the cell you want to divide and right click on the mouse.
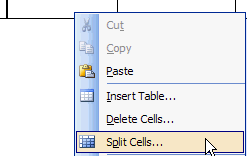
Select Split Cells... The following dialog box will appear:
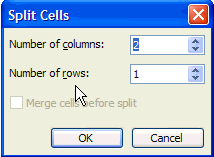
Adjust the number of columns and rows and click OK.
Changing the Size of the Table:
You may not need the table to run from margin to margin, and you can adjust the size of the table.
Slide your cursor over the table. Notice that you have a small box on the lower left corner of the table. While you click/hold this box with your mouse, drag the box left to make the table smaller and right to make it larger.
You can center this smaller table on the page. Slide your cursor over the table and click on the + box to select the entire table. Now you can use the regular Word tools for centering to center the table.
Text Direction:
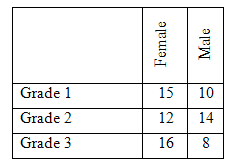
Often the title of a column is much longer than the data inside. See the example below:
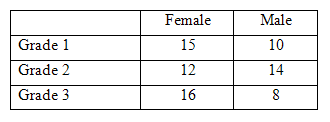
If the words Female and Male were vertical rather than horizontal, the width of those two columns could be narrower.
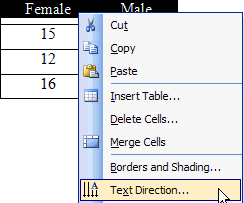
Highlight the words you want to move from vertical to horizontal. In this case Female and Male would be highlighted. Then right click on one of the highlighted cells and go to Text Direction:
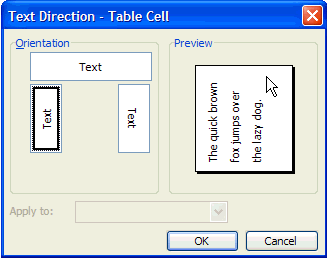
Select the Orientation that you want and click OK:
The table now should appear similar to the one below: