Instructor Tutorial: WebCT Mail Tool (E-mail) |
| |
|
|
| |
| With the Mail Tool, you can:
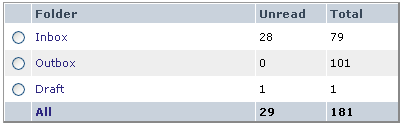
When you click on the Mail icon, you are brought to the Mail screen, where you will see a listing of four default folders: Inbox, Outbox, Draft, and All. None of these default folders can be deleted. Each folder displays the number of unread messages, plus the total number of messages stored in that folder.
To write a message to anyone
in your class, click the |
| |
Compose and Send MessagesFrom the Mail screen
or from the Mail Messages screen inside one of the folders,
click the button
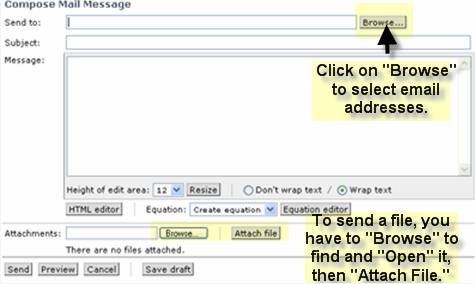
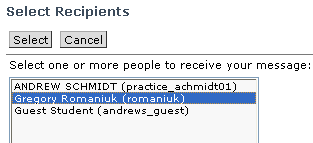
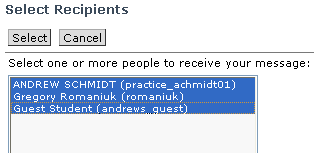
Enter the recipient's email addresses in the Send to box. WebCT email addresses are usually the recipients' first and last names. To send a message to more than one person, separate multiple names with commas. If you do not remember everyone's email address, or if you want save yourself the time of typing addresses, click the [Browse] button next to the Send to box to view a list of all names in the class. Click on the name of your desired recipient and click [Select].
The name will be automatically placed in the Send to box. To select more than one name at a time, press [Ctrl] on the keyboard while you select multiple names. If you are using a Macintosh computer, press the "Apple" key instead of [Ctrl]. After you have entered the email addresses in the Send to box, · Enter a subject in the Subject Box. This box cannot be left blank.
o
The Height of edit area drop-down list
o
The Wrap text radio buttons
o
The
o
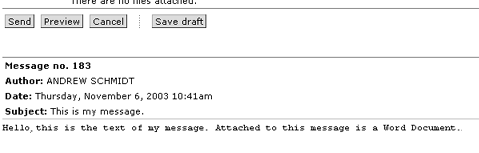
The o You may also attach a file to your email message in the Attachments section. · Before sending your message you may first click [Preview] to view how the message will appear for the recipient. A new Preview window will appear. Click [Close] to close the Preview window. · To send the message click [Send]. A copy will be saved in your Outbox folder.
·
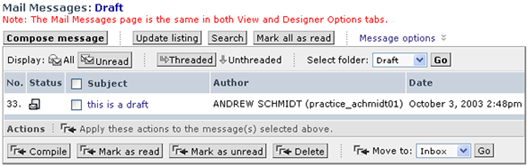
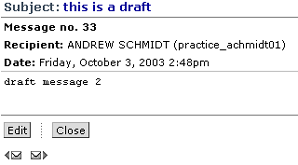
You may also click [Draft] to save an unfinished draft of your
message in order to send it later. The message will be saved in the
Draft Folder. To access the draft of the message, from Mail,
click on the message in the Draft Folder.
Send a Message to Everyone in Your Class:· From the mail screen, click [Compose message]. The Compose Mail Message window appears. · Click the [Browse] button next to the Send to box. The list of class members appears.
·
Click on the first name in the list, and while keeping the
mouse key depressed, drag the mouse down the entire list of names.
All the names will then be selected.
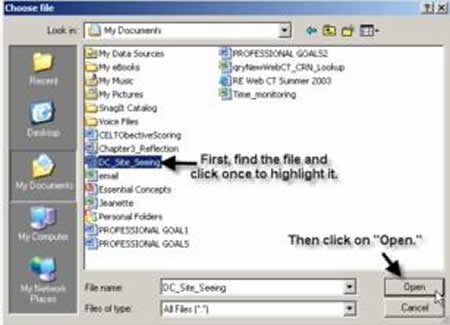
· Click [Select]. The names of all class members will now appear in the Send to box. · Type your message as desired and click [Send]. Attach Files to Your Messages:· From the mail screen, click [Compose message]. The Compose Mail Message window appears. · In the Attachments sections, click [Browse] to locate the file on your computer. Your browser's file browser window appears.
·
Locate your file in the browser window and double click on
the name of your file. The path to the file will appear in the Attachments
text box.
· Click [Attach file] to attach the file to your message. *Do not forget this final important step!* Note:
DON’T
Send a Message:· For instructions how to compose a message or send a message to everyone in your class, refer to Compose and Send Messages. · Before sending your message you may first click [Preview] to view how the message will appear for the recipient. A new Preview window will appear. Click [Close] to close the Preview window. · To send the message click [Send]. A copy will be saved in your Outbox folder. · You may also click [Draft] to save an unfinished draft of your message in order to send it later. The message will be saved in the Draft Folder. To access the draft of the message, open the Draft Folder and click on the name of the message. · Click [Edit] to edit and send the message. |
| |
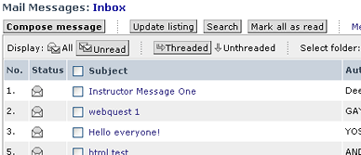
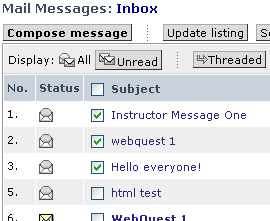
Read MessagesBy default, your email messages are stored in chronological order. Inbox, Outbox, and Draft folders appear on your Mail screen.
Click on the Inbox to view messages that you received. The Mail Messages screen for Inbox appears.
Unread appear in
bold. Read messages appear as plain text. If there is a read message,
a small paperclip icon
· [Update listing] - Click to display any new messages sent after you accessed the page. · [Search] - Click to pull up the Search Mail window. Refer to the Search Mail Messages section for more information. · [Mark all as read] - Click to change all messages, whether or not you have read them, to display as having been read. · [All] - Click to view both read and unread messages. · [Unread] - Click to view only unread messages.
·
[Threaded] - Click to view messages grouped in threads.
Threads are groups of messages replying to the same subject. Threaded
messages will be grouped under the original subject next to a magnifying
glass · [Unthreaded] - Click to view messages in chronological (unthreaded) order. · Select folder - This drop-down menu allows you to view messages from either your Inbox, Outbox, Draft folder, or All, displaying all three folders. Select one of these options from this drop-down menu and click [Go]. · Message options - Click to move automatically to the Message options bar at the bottom of the Inbox. This is the Message options bar at the bottom of the Inbox.
· [Compile] - Use to compile and download a list of messages into one document. Refer to the Compile and Download Messages section. · [Mark as read] - To display specific unread messages as having been read, select the box next to the message and click [Mark as read]. To select all messages in a thread, select the box next to the magnifying glass in the original subject of the thread. To select all messages in the folder, select the check box next to Subject in the header of the subject column. · [Mark as unread] - To display read messages as unread, select the box next to the messages and click [Mark as unread]. Marking messages as unread may serve as a reminder to go back and respond to a message. To select all messages in a thread, select the box next to the magnifying glass in the original subject of the thread. To select all messages in the folder, select the check box next to Subject in the header of the subject column. · [Delete] - Select the boxes next to messages you would like to delete and click [Delete]. · Move to: - This drop down list can be used to move mail messages to different folders. Select the box next to the message(s) you would like to move and then select the destination folder from this list. Click [Go]. Refer to Manage Mail Folders for more information. To read a message, simply click on its Subject. The Mail Message screen appears.
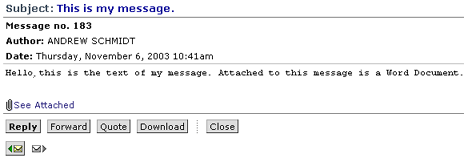
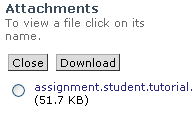
If there is an attached file, it is recommended that you download the attachment to your computer before opening it. It is also recommended that you install anti-virus software before viewing or downloading any attachments. To download an attachment:
· Select the radio button next to the attached file. · Click [Download]. Your browser's download screen appears. · Follow the on screen instructions to save the file to your computer. When finished, the Attachments screen reappears. · Click [Close]. To view an attachment:
·
Click the paperclip icon · Click on the name of the attached file. Your browser's download screen appears. Click [Open]. |
| |
Reply to MessagesYou may reply to a message once you have read it. Refer to Read Messages for information on reading messages. To reply to messages from other WebCT users:
· The text of the original message may not be edited and will not appear for the recipient of the reply. If you would like the text of the original message to appear in your message text box, refer to the Quote Messages section below. · After typing your reply message click [Send]. For help in composing a mail message, refer to the Compose and Send Messages section. · If you want to reply to a message containing an equation from the equation editor, you cannot edit the equation using the [Reply] option. You may only edit equations using the [Forward] or [Quote] options. Quote MessagesUnlike the [Reply] button, the [Quote] button displays the text of the old message within your Message text box. The text may be edited as part of your reply message. This is particularly helpful if you wish to refer directly to the text of the original message. To Quote a message: · Click on the subject of the message you wish to quote. The message appears in a new window. · Click [Quote]. The Compose Mail Message window appears with the text of the original message within the Message text box.
· Type your reply message in the Message text box. For help in composing a mail message, refer to the Compose and Send Messages section. · Click [Send]. Forward MessagesUnlike the [Reply] or [Quote] buttons, which only allow you to send a message to the original sender, the [Forward] button allows you to send your received message to anyone in the class. To forward a message: · Click on the subject of the message you like forward. The message appears in a new window. · Click [Forward]. The Compose Mail Message window appears with the text of the forwarded message in the Message text box. · Enter the email address of the recipient in the Send to box. You may also type a message in the Message box if desired. For help in composing a mail message, refer to the Compose and Send Messages section. · Click [Send]. |
| |
Delete MessagesInstructors may find that their email folders fill up quickly. For tips on how to use the Discussion tool to reduce the number of email messages sent, refer to Pedagogical Tips. To delete messages: · From the Mail screen, open the folder (e.g.. Inbox, Outbox, Drafts, etc.) containing messages you would like to delete. The folder's Mail Messages screen appears. · Select the checkbox next to the messages you would like to delete. You may select any number of messages.
·
To select all messages, select the check box next to Subject
at the top of the subject row. To select all messages in a thread,
select the box next to the magnifying glass
·
Click · A warning message appears. Click [OK]. All messages are now deleted. To delete all messages in a folder:
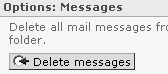
·
From the Mail screen, select the radio button · Under Options: Messages (on the right side of the screen), click [Delete messages].
· A warning message appears. · Click [OK]. All messages in the folder are now deleted. To delete all messages in all folders: · On the Mail screen under Options: Messages (on the right side of the screen), click [Delete all messages]. · A warning message appears. Click [OK]. All messages in all folders are now deleted. |
| |
Manage Mail FoldersEach WebCT user has four default mail folders Inbox, Outbox, Draft, and All. These default folders can be renamed, but they may not be deleted. You may also create new folders. The new folders may be renamed and deleted. You may also move messages to different folders. Create New Mail FoldersTo create a new folder:
· The Create Folder screen appears.
·
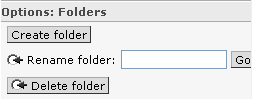
Enter a name for your folder in the Folder name text box. · Click [Create]. The Mail screen appears with your new folder added to the list of folders. To delete a folder:
·
From the Mail screen, select the radio button · Under Options: Folders (on the right side of the screen), click [Delete folder]. A warning screen appears. · Click [OK]. The folder is deleted. Rename a Mail FolderBoth the default folders (Inbox, Outbox, Draft, and All) and the new created folders may be renamed. To rename a folder:
·
From the Mail screen, select the radio button · Under Options: Folders (on the right side of the screen), enter the new name of the folder in the Rename folder text box.
Move Messages to Different FoldersAny message may be moved to any folder. To move a message to a different folder: · From the Mail screen, click on the folder containing the message you want to move. The Mail Messages screen appears. · Select the checkbox next to the message(s) you want to move.
·
To select all messages in a thread, select the box next to the magnifying
glass
·
Under the Move to drop-down list at the bottom of the screen
· Click [Go]. A warning window appears. · Click [OK]. The message(s) are moved. |
| |
Search Mail MessagesWith large numbers of messages, a Search option may be very helpful to look up a specific message. You can also look up a group of messages and compile and download them. This feature is helpful for instructors compiling assignments emailed from the entire class. You may search your mail messages based on:
The
To search your mail messages: · From the Search drop-down list, select All to search all messages, or Unread to search only messages you have not read. · From the Folder drop-down list, select a folder to search. · From the Criteria drop-down list, select the search filter, allowing you to limit your search:
· From the Comparison drop-down list, select how the filter from Criteria will compare with the search terms entered in the Value box. Select one of the following:
|
| |
Compile and Download messagesYou may compile any number of email messages into one file and download that file to your computer or to a disk. This option is especially helpful for compiling assignments that have been emailed to you. To compile and download messages: · From the Mail screen, open the folder (e.g. Inbox, Outbox, Drafts, etc.) containing messages you wish to compile. The folder's Mail Messages screen appears. · Ensure that all of the messages are displayed as you prefer by selecting either [All] or [Unread] and either [Threaded] or [Unthreaded]. · Select the check boxes next to the messages that you wish to compile.
·
To select all messages in a thread, select the box next to the magnifying
glass
·
Click · Click [Download]. The file download window for your browser appears. · Follow the onscreen instructions to save the file either to a disk or to your hard drive. |
| |
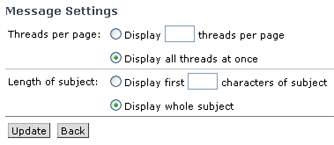
Adjust Message SettingsThe
You may adjust the number of threads and the length of the message subject that are displayed per page. Adjusting the number of threads will adjust the number of messages or threads that are displayed on Mail Messages screens. If you have a very long page of messages, you may adjust the number of threads to break the long pages into several shorter pages. To adjust the number of threads to display per page: · On the Mail screen, click [Message Settings]. The Message Settings screen appears. · Next to Threads per page, select the radio button for one of the following options:
o
o
· Click [Update]. · To return to the Mail screen, click [Back]. Adjusting the Length of subject will change the length of message subject that appears with every message. Some message subjects may be very long and may be difficult to understand unless the entire subject is displayed. Displaying long subjects, however, causes the Mail Messages screen to be very wide and scroll off the right side of the screen. To adjust the Length of subject: · On the Mail screen, click [Message Settings]. The Message Settings screen appears. · Next to Length of subject, select the radio button for one of the following options:
o
o
· Click [Update]. · To return to the Mail screen, click [Back]. |
| |
Pedagogical TipsThe email tool allows the instructor to give rich, rapid feedback and can be an excellent resource to facilitate interaction and group work among students. When using the email tool, you will not have to worry about receiving unwanted messages from outside of WebCT or keeping track of changing email addresses. It is important to remember that neither the discussion tool nor mail tool will allow you to retract a message once it has been sent! It may be helpful to emphasize to students that the mail tool is used for private questions regarding grades and other private issues. The discussion board is a better venue for course-related questions where the answer may be relevant for all students in the class. Using the discussion board for course-related question may prevent you from answering the same question several times through email. If a student sends a relevant comment or question through email, email him/her back and request to put the comment on the discussion board. Further tips are below: 1. If you would like to respond to a message but do not have the time, mark the message as "unread" to remind yourself to come back to it later. 2. You may use the email tool to attach files to send to students, but for files to be sent to the entire class, consider posting them on the discussion board. If you post an assignment on the discussion board, you may ask students to reply privately so that the assignment is returned to your mail box. 3. Use the mail tool for students to submit assignments with written responses. Ask students to put the same subject in the subject line so you may compile and download the assignments quickly. 4. If typing a longer message, you may save it as a draft to come back to it later, or you may compose it using a word processor and cut and paste the finished text into the message box. 5. Use the search tool for help in organizing longer lists of messages. 6. If you rename folders, do not forget which folder was originally the inbox, outbox, and draft folder. 7. You may send messages from the Manage Students page. Next to a student's name is a mail icon which will bring up a compose mail message screen addressed to the student. 8. With the student presentation tool, you can email students by group. 9. If you use the equation editor in your class, consider giving students some practice with it first. To edit equations in a reply, use the quote or forward options. |
 The Mail Tool facilitates asynchronous online communication
between members of the class and the instructor and teaching assistants.
Each member of the class and the instructor are given private
The Mail Tool facilitates asynchronous online communication
between members of the class and the instructor and teaching assistants.
Each member of the class and the instructor are given private